Pixelbook Linux Setup
About
This page describes the setup process that I used to dual-boot my Pixelbook with Linux and Chrome OS. It is based on various other guides and hints, listed below.
Sources
- Chromium OS - Disk Format
- chrx.org
- mrchromebox.tech
- ArchLinux Wiki > Chrome OS Devices
- Fuchsia > Hardware > Pixelbook
- Chromium OS > Developer Information for Devices > CTRL + F “Pixelbook”
- GitHub > MrChromebox > Scripts (normally run in developer mode to do everything automatically
- GitHub > chrx > install-chroot.sh
- Medium > Adrian Carroll > How to dual boot ChromeOS and Linux
- Fascinating Captain > How do I dual boot Chrome OS and Linux using a USB drive
- Saagar Jha > Dual Booting Chrome OS and elementary OS
- Huy Le - Installing Linux on Pixelbook
Introduction
The Goal is to adapt the Pixelbook setup so that it can dual-boot Chrome OS ( in Developer Mode ) and Linux. Without flashing the firmware, explicitly NOT having to remove/disable the firmware write-protect. Using Legacy Boot Mode. This will put Chrome OS into “Developer Mode” but we won’t enable additional “Debugging Features”.
All data on the Pixelbook is wiped in the process.
Needed Hardware
- Google Pixelbook
- USB Stick for Linux install Image (4GB to 8GB)
- USB Stick for Chrome OS Recovery Image (8GB)
- USB Stick for Ubuntu Live
Preparations
You MUST prepare a USB Stick with a Chrome OS Recovery Image. If anything goes wrong during the installation/setup procedure, the device might end up without an OS to run. You don’t want that.
- Install the Chromebook Recovery Utility and create a bootable Recovery USB Stick.
- Use the same utility to download the Linux distribution of your Choice. Rename downloaded .iso file to .bin to use it in the Recovery Utility.
Further Safety Net: Google Support > Chromebook wiederherstellen
Developer Mode
Note that Developer Mode disables security features and may leave your device open to attack. Only enable if you understand the risks.
- Turn off your chromebook
- Press and hold the Esc key, refresh key, then press the power button at the same time. You should enter Recovery mode.
- When the “Chrome OS is missing or damaged. Please insert a recovery USB stick or SD Card.” message shows up, press and hold the Ctrl and D keys simultaneously.
- Some Chromebooks may require you to turn OS verification off. Press Enter (if required).
- Wait for the device to restart and go through the Chromebook setup process. This will take several minutes. Initially it may not appear to be doing anything. Let the device sit for a minute or two. You will hear two loud BEEPs early in the process.
-
The process is ONLY complete when you hear two more loud BEEPs! It might boot multiple times in-between.
- You will get an odd screen saying that OS verification is off.
- Press Ctrl and D to restart successfully.
From now on this screen with the warning will come up on every boot. The screen will time out after 30 seconds, playing a warning beep. From the warning screen, the following keyboard shortcuts are available:
- Ctrl + D: Boot the system from the internal disk (Chrome OS in Developer Mode)
- Ctrl + U: Boot the system from an external USB stick or SD card. The option
crossystem dev_boot_usb=1must be set from the command line before this option is available. - Ctrl + L: Chain-load an alternative bootloader (e.g. SeaBIOS). The option crossystem
dev_boot_altfw=1must be set from the command line before this option is available.
Enable Legacy Boot Mode & USB Boot
- Start the Chromebook
- You should see a screen that says “OS verification is OFF” and approximately 30 seconds later (or use CTRL + D to speed up) the boot will continue.
- Wait for the Welcome or Login screen to load. Ignore any link for “Enable debugging features”.
- Get to a command prompt. Details:
- One way to get the login prompt is through something called VT-2, or “virtual terminal 2”. You can get to VT-2 by pressing: CTRL + ALT + XXX where the XXX key is the key in the F2 position which may be the refresh key or another key. NOTE: The top-rows of the keyboard on a Chrome OS device are actually treated by Linux as the keys F1 through F10. Thus, the refresh key is actually F2 and the back key is actually F1. NOTE: Kernel messages show up on VT-8.
- Once you have the login prompt, you should see a set of instructions telling you about command-line access. By default, you can login as user
chronoswith no password. This includes the ability to do password-less sudo. The instructions on the screen will tell you how you can set a password.
To get from the crosh shell to a full shell, use the command shell.
- In order to get back to the browser press: CTRL + ALT + F1 (Back key)
- Press Ctrl + Alt + Refresh to enter a command shell. If pressing this key combination has no effect, try rebooting the Pixelbook once more.
- Enable USB booting by running
sudo crossystem dev_boot_usb=1 - Enable Legacy Boot mode by running
sudo crossystem dev_boot_altfw=1
If you ever want to become root, use sudo su -
Partitioning
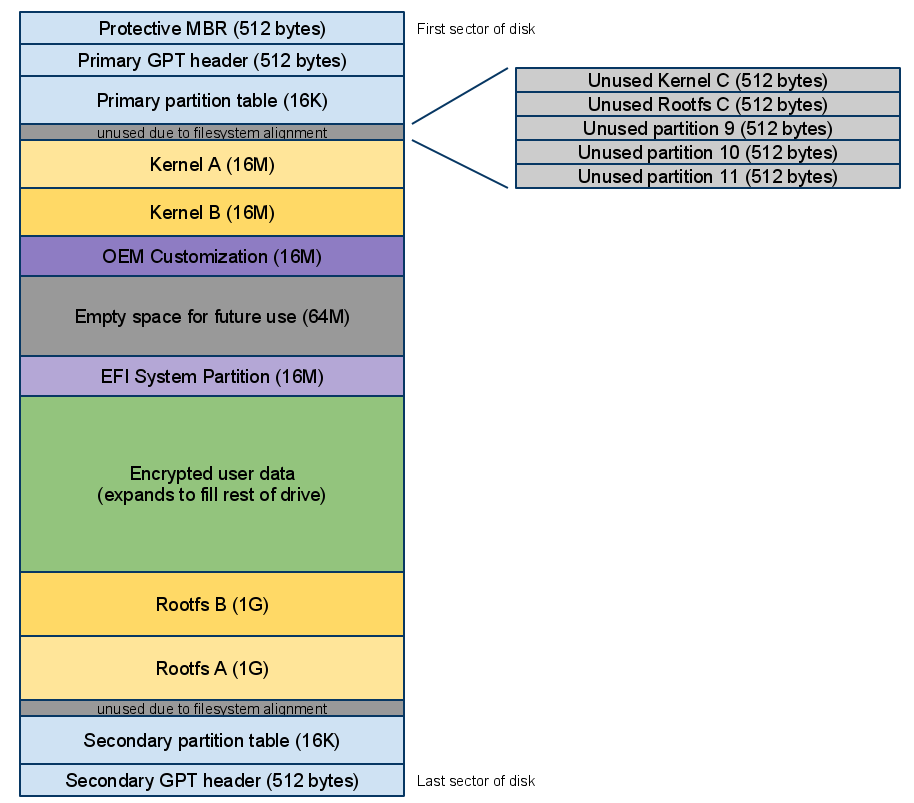
Chromium OS comes with 12 partitions pre-installed. Removing ANY of these partitions breaks chrome OS. The goal of “proper” partitioning is to keep ChromeOS intact and have a working Linux system. To do this, one has to understand the partitioning scheme.
| Partition | Usage | Purpose |
|---|---|---|
| 1 | STATE user state, aka “stateful partition | User’s browsing history, downloads, cache, etc. Encrypted per-user. |
| 2 | KERN-A kernel A | Initially installed kernel. |
| 3 | ROOT-A rootfs A | Initially installed rootfs. |
| 4 | KERN-B kernel B | Alternate kernel, for use by automatic upgrades. |
| 5 | ROOT-B rootfs B | Alternate rootfs, for use by automatic upgrades. |
| 6 | KERN-C kernel C | Minimal-size partition for future third kernel. |
| 7 | ROOT-C rootfs C | Minimal-size partition for future third rootfs. |
| 8 | OEM OEM customization | Web pages, links, themes, etc. from OEM. |
| 9 | RESERVED MiniOS A | Recovery partition A |
| 10 | RESERVED MiniOS B | Recovery partition B, for upgrades. Must reside at the end of the disk. |
| 11 | RFWF Hibernate | Small partition reserved for hibernation state. |
| 12 | EFI-SYSTEM EFI System Partition | Contains 64-bit grub2 bootloader for EFI BIOSes, and second-stage syslinux bootloader for legacy BIOSes. |
Each minimal-size partition (including the C kernel and C rootfs) is only 512 bytes, and is shoved into some space lost to filesystem alignment (between the primary partition table and the stateful partition). 64M of empty space is set aside for use by those reserved partitions if they ever need it.
We want to use partition 6 and 7 to store our Linux installation. One will become /boot, the other will become /.
This is made possible because the physical layout on the Disk is actuall different from the GPT partitioning table:
With this understood, it becomes time to think about the sizes you want to allocate: The current plan is to use 10 GB for STATE and the remaining space for Linux.
The command we will be using throughout this section is cgpt, which handles partitions on Chrome OS. It is quite important that Chrome OS is the only thing that touches your partitions. Manipulating the partitions with ANY other tools did cause errors for me: “Chrome OS is missing or damaged”.
cpgt requires superuser privileges to run, and always takes as an argument the device it will work on.
For eMMC backed-computers like my i5 Pixelbook, this is /dev/mmcblk0 (if you have an SSD it might be /dev/sda).
This guide this guide, explains how we will do partitioning by hand:
First, list the partitions on the disk:
$ sudo cgpt show /dev/mmcblk0
   start        size    part  contents
       0           1          PMBR (Boot GUID: BB000A0D-0001-0EB4-CD10-AC3C0075F4C3)
       1           1          Pri GPT header
       2          32          Pri GPT table
17092608   227151872       1  Label: "STATE"
                              Type: Linux data
                              UUID: 56FACA9B-B561-5E4E-B225-67FF9101E64A
   20480       32768       2  Label: "KERN-A"
                              Type: ChromeOS kernel
                              UUID: 0981A5B2-C79A-E145-802A-DEA62009F8DA
                              Attr: priority=1 tries=0 successful=1
  870400     8388608       3  Label: "ROOT-A"
                              Type: ChromeOS rootfs
                              UUID: BDBF49E7-B855-D04E-B09E-FDF2FE9E72A9
   53248       32768       4  Label: "KERN-B"
                              Type: ChromeOS kernel
                              UUID: F7D51A74-2D18-5649-B352-B3C779269C71
                              Attr: priority=0 tries=15 successful=0
  315392     8388608       5  Label: "ROOT-B"
                              Type: ChromeOS rootfs
                              UUID: D47975C2-3B96-F54A-AAA7-394802C5BED2
   16648           1       6  Label: "KERN-C"
                              Type: ChromeOS kernel
                              UUID: 64A4302A-7FFD-0543-9ADD-004D20919615
                              Attr: priority=0 tries=15 successful=0
   16649           1       7  Label: "ROOT-C"
                              Type: ChromeOS rootfs
                              UUID: 09C55DBA-67B7-A14A-BC05-C93124403597
   86016       32768       8  Label: "OEM"
                              Type: Linux data
                              UUID: DB2D7C8A-7F32-1F46-BC47-313EAB282E35
   16450           1       9  Label: "reserved"
                              Type: ChromeOS reserved
                              UUID: 531EB8EE-4240-2D44-A85F-27521C3934B0
   16451           1      10  Label: "reserved"
                              Type: ChromeOS reserved
                              UUID: F2E20DFD-8967-DE4F-96A2-F780936B29A2
      64       16384      11  Label: "RWFW"
                              Type: ChromeOS firmware
                              UUID: 9AC55AEB-1593-C247-BC54-9C9D9998990B
  249856       65536      12  Label: "EFI-SYSTEM"
                              Type: EFI System Partition
                              UUID: CDCA82E4-547E-BE4E-AD55-C3B5EFD5DF79
                              Attr: legacy_boot=1
244277215          32          Sec GPT table
244277247           1          Sec GPT header
The partitions are listed with their labels, partition number, start block, and size. Blocks are 512 bytes in length; notice that while the table is listed in logical order, it is not in physical order–the blocks are actually in a different order on disk.
It is recommended that you create - and understand - a table like below to grasp the logical order of partitions:
| Number | Label | Start | Size |
|---|---|---|---|
| 11 | RWFW | 64 | 16384 |
| 6 | KERN-C | 16648 | 1 |
| 7 | ROOT-C | 16649 | 1 |
| 9 | reserved | 16450 | 1 |
| 10 | reserved | 16451 | 1 |
| 2 | KERN-A | 20480 | 32768 |
| 4 | KERN-B | 53248 | 32768 |
| 8 | OEM | 86016 | 32768 |
| 12 | EFI-SYSTEM | 249856 | 65536 |
| 5 | ROOT-B | 315392 | 8388608 |
| 3 | ROOT-A | 870400 | 8388608 |
| 1 | STATE | 17092608 | 227151872 |
Luckily, the STATE partition (which is the first one, logically) is right at the very end physically, which means we can shrink it easily. To do this, we can use cgpt add, which takes the partition number with -i, starting block with -b, and size in blocks with -s.
STATE will keep start location. KERN-C will be moved behind STATE ROOT-C will be moved behind KERN-C.
The chrx > setup-storage script does this via nice logic:
# Determine Target Disk (likely /dev/mmcblk)
  CHRX_TARGET_DISK="`sudo rootdev -d -s`"
# Get current partition sizes
  ckern_size="`sudo cgpt show -i 6 -n -s -q ${CHRX_TARGET_DISK}`"
  croot_size="`sudo cgpt show -i 7 -n -s -q ${CHRX_TARGET_DISK}`"
  state_size="`sudo cgpt show -i 1 -n -s -q ${CHRX_TARGET_DISK}`"
# Sizes: Recommended size for Linux is Maximum Size of Chrome OS "state" minus 10GB
# Leaving 10GB for Chrome OS, Rest will become Linux
  max_os_size=$((${state_size}/1024/1024/2))
  os_size=$((${max_os_size} - 10))
# Calculate new Partition sizes. ROOT-C will become our Linux partition
  rootc_size=$((${os_size}*1024*1024*2)) # sector size for rootc
  kernc_size=2097152 # kernc is always 1024MB
# New STATE size with rootc and kernc subtracted from original
  stateful_size=$((${state_size} - ${rootc_size} - ${kernc_size}))
# Start stateful at the same spot it currently starts at
  stateful_start="`sudo cgpt show -i 1 -n -b -q ${CHRX_TARGET_DISK}`"
# Start kernc at stateful start plus stateful size
  kernc_start=$((${stateful_start} + ${stateful_size}))
# Start rootc at kernc start plus kernc size
  rootc_start=$((${kernc_start} + ${kernc_size}))
# Validate Manually
  echo "  stateful_start ${stateful_start}"
  echo "  stateful_size  ${stateful_size}"
  echo "  kernc_start    ${kernc_start}"
  echo "  kernc_size     ${kernc_size}"
  echo "  rootc_start    ${rootc_start}"
  echo "  rootc_size     ${rootc_size}"

# Start Partitioning
  sudo umount -f /mnt/stateful_partition
  sudo cgpt add -i 1 -b ${stateful_start} -s ${stateful_size} -l STATE ${CHRX_TARGET_DISK}
  sudo cgpt add -i 6 -b ${kernc_start} -s ${kernc_size} -l KERN-C -t "kernel" ${CHRX_TARGET_DISK}
  sudo cgpt add -i 7 -b ${rootc_start} -s ${rootc_size} -l ROOT-C ${CHRX_TARGET_DISK}
For my Pixelbook i5 this logic did result in:
sudo rootdev -d -s
# /dev/mmcblk0

ckern_size = 1
croot_size = 1
state_size = 227151872

max_os_size = 108.314453125
os_size = 95

rootc_size = 199229440
kernc_size = 2097152

stateful_size = 25825280
stateful_start = 17092608

kernc_start = 42917888
rootc_start = 45015040
# Start Partitioning
sudo umount -f /mnt/stateful_partition
sudo cgpt add -i 1 -b 17092608 -s 25825280  -l STATE /dev/mmcblk0
sudo cgpt add -i 6 -b 42917888 -s 2097152   -l KERN-C -t "kernel" /dev/mmcblk0
sudo cgpt add -i 7 -b 45015040 -s 199229440 -l ROOT-C /dev/mmcblk0
Now we use the firmware script from mrchromebox.tech to update the SeaBIOS Legacy Firmware. Follow the advice on the site!
As of 2021.10.31 this was:
cd; curl -LO mrchromebox.tech/firmware-util.sh
sudo install -Dt /usr/local/bin -m 755 firmware-util.sh
sudo firmware-util.sh
With this done, you can reboot the system:
sudo reboot
When Chrome OS boots up, you will hear two loud BEEPs again, and the OS will repair itself, taking about five minutes (there’s a small, somewhat accurate timer in the top left that tracks progress). Once it’s done booting, drop back into a shell; we now need to format the new partitions as ext4 so they will be usable from Linux.
Once you’re back in a shell, use mkfs.ext4 to initialize the partitions we will be using for Linux (KERN-C and ROOT-C, which are the sixth and seventh partitions in /dev/mmcblk0):
sudo umount -R /dev/mmcblk0p6
sudo umount -R /dev/mmcblk0p7
sudo /sbin/mkfs.ext4 /dev/mmcblk0p6
sudo /sbin/mkfs.ext4 /dev/mmcblk0p7
Also: explicitly set the boot options again:
sudo crossystem dev_boot_usb=1
sudo crossystem dev_boot_altfw=1
Install Linux
- Plug the USB drive with the Linux Installer into the Pixelbook. Avoid using a USB hub.
- Reboot by typing
sudo reboot - On the “OS verification is OFF” screen press CTRL+L to boot SeaBIOS.
- Press
ESCto get the SeaBIOS Boot menu. You only have about 2 seconds for this! Choose the Linxu Install USB Stick. - Note that ChromeOS bootloader USB enumeration during boot has been observed to be slow. If you’re having trouble booting from USB, it may be helpful to remove other USB devices until the device is through the bootloader and also avoid using a USB hub.
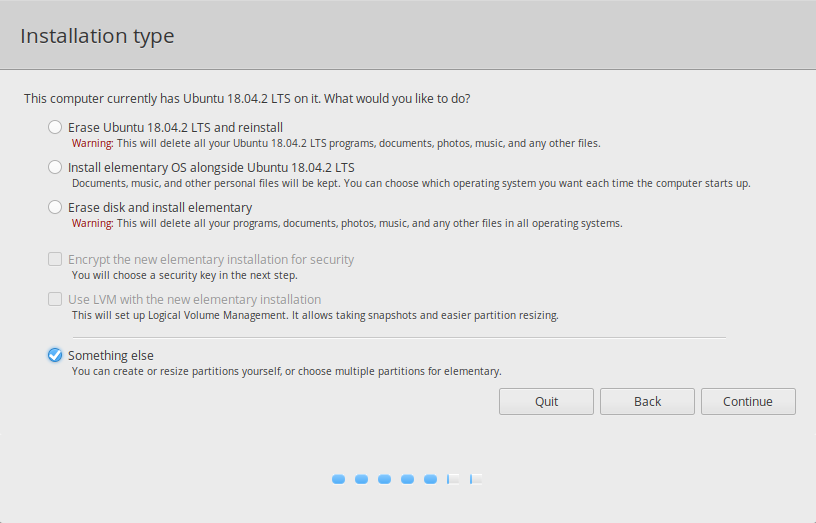
- Use the Installer to Install Linux. When the Installation Type is to be chosen make sure to choose “Something else”
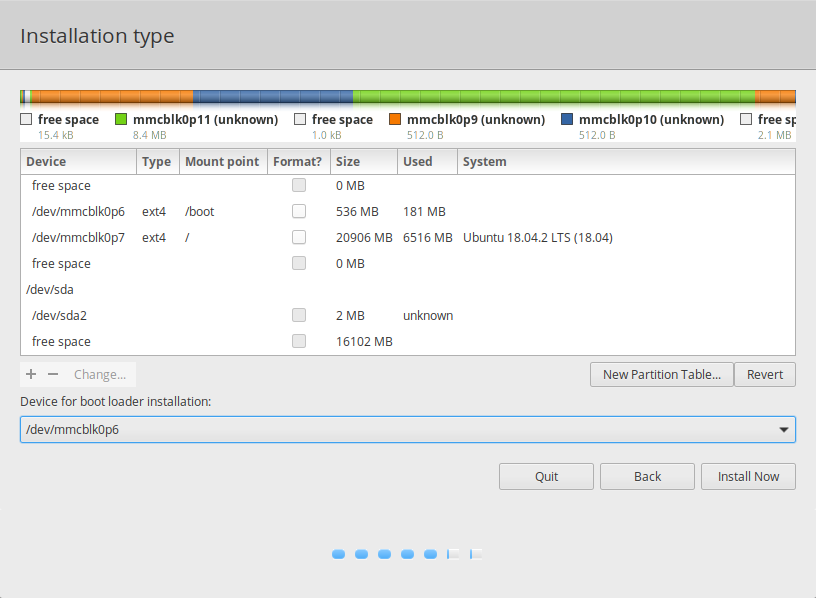
- This will take you to the partition editor. Here, you need to modify the KERN-C and ROOT-C partitions. Click on them and them change them to have a “Ext4 journaling file system” (do not format the partitions! Leave the checkbox unchecked!); in addition, change the mount point for the first one to
/bootand the second to/(this might cause the installer to prompt about performing a resize. You should be able to just hit back on the dialog and it should work out). - Finally, change the device for boot loader installation to where KERN-C is. In the end, it should look something like this:
- If you are installing Debian, the GRUB installation to KERN-C /dev/mmcblk0p6 will come after normal partitioning has been done
- Going to the next step will probably cause some warnings to pop up about not formatting; just skip through those. You don’t want to format.
- If the Linux installer makes any changes to the partitions (other than you having assigned mount points) it will likely result in an unbootable ChromeOS.
Fixing GRUB
Your Linux installation - in the current state - will NOT boot yet. This is because GRUB is in a broken state.
It is now time to “fix grub”. I used an Ubuntu Linux Live USB Stick for this, which I booted via CTRL + L then choosing USB Stick in SeaBIOS.
Becuase the main Debian installation did not know the command grub-install.
In Ubuntu I had trouble with the screen rotation, xrandr -o normal fixed this.
this guide as well as the chrx chroot script both do the following changes to GRUB Defaults:
  sudo mkdir /mnt/boot
  sudo mount /dev/mmcblk0p6 /mnt/boot
  sudo mkdir /mnt/boot/grub
  nano /etc/default/grub
We want to make certain changes!
Find and comment out:
GRUB_HIDDEN_TIMEOUT
GRUB_TIMEOUT
GRUB_CMDLINE_LINUX
The chrx chroot example config, which is only APPENDED to existing config, looks like this:
## boot settings
##
## GRUB_TIMEOUT        delay before boot (ESC for menu), in seconds
## GRUB_TIMEOUT_STYLE  UI for delay (menu|countdown|hidden)
GRUB_TIMEOUT=10
GRUB_TIMEOUT_STYLE=menu
GRUB_GFXMODE=1920x1080,1680x1050,1600x900,1366x768,1280x850,1024x768,auto
GRUB_TERMINAL_OUTPUT=gfxterm
## kernel parameters
##
## GRUB_CMDLINE_LINUX_DEFAULT   sets parms for normal boot
## GRUB_CMDLINE_LINUX           sets parms for normal and recovery boot
##
##  quiet                     suppress most messages
##  splash                    boot with splash screen
##  boot=local                (redundant?)
##  acpi_osi=Linux            add Linux to list of supported OS interfaces
##  acpi_backlight=vendor     prefer vendor backlight driver
##  add_efi_memmap            include EFI extensions to E820 BIOS map
##  intel_pstate=enable       enable CPI power state management, cpupower(8)
##  i915.modeset=1            setting for Intel 915 GPU/HD Audio chip
##  tpm_tis.force=1           ignore ACPI TPM interrupts, poll instead
##  tpm_tis.interrupts=0      skip TPM interrupt probing (redundant with prev)
##  nmi_watchdog=panic,lapic  panic when NMI watchdog expires or local APIC
##  elevator=noop             do not reorder disk IO to minimize head seeks
##  resume=/dev/sda5          save hibernation state to /dev/sda5
##  noresume                  no resume partition (for hibernate)
##  noswap                    no swap partition
GRUB_CMDLINE_LINUX_DEFAULT="quiet splash boot=local acpi_osi=Linux acpi_backlight=vendor add_efi_memmap intel_pstate=enable i915.modeset=1 tpm_tis.force=1 tpm_tis.interrupts=0 nmi_watchdog=panic,lapic elevator=noop noresume noswap"
Using this as a template, my final Debian /etc/defaults/grub file looked like this:
# If you change this file, run 'update-grub' afterwards to update
# /boot/grub/grub.cfg.
# For full documentation of the options in this file, see:
#   info -f grub -n 'Simple configuration'

GRUB_DEFAULT=0
GRUB_TIMEOUT=5
GRUB_DISTRIBUTOR=`lsb_release -i -s 2> /dev/null || echo Debian`
GRUB_CMDLINE_LINUX_DEFAULT="quiet splash boot=local acpi_osi=Linux acpi_backlight=vendor add_efi_memmap intel_pstate=enable i915.modeset=1 tpm_tis.force=1 tpm_tis.interrupts=0 nmi_watchdog=panic,lapic elevator=noop noresume"
GRUB_CMDLINE_LINUX=""

# Uncomment to enable BadRAM filtering, modify to suit your needs
# This works with Linux (no patch required) and with any kernel that obtains
# the memory map information from GRUB (GNU Mach, kernel of FreeBSD ...)
#GRUB_BADRAM="0x01234567,0xfefefefe,0x89abcdef,0xefefefef"

# Uncomment to disable graphical terminal (grub-pc only)
#GRUB_TERMINAL=console

# The resolution used on graphical terminal
# note that you can use only modes which your graphic card supports via VBE
# you can see them in real GRUB with the command `vbeinfo'
GRUB_GFXMODE=1920x1080,1680x1050,1280x1024,1440x900,1152x864,1024x768,auto
GRUB_TERMINAL_OUTPUT=gfxterm

# Uncomment if you don't want GRUB to pass "root=UUID=xxx" parameter to Linux
#GRUB_DISABLE_LINUX_UUID=true

# Uncomment to disable generation of recovery mode menu entries
#GRUB_DISABLE_RECOVERY="true"

# Uncomment to get a beep at grub start
#GRUB_INIT_TUNE="480 440 1"
And after having updated it,
sudo grub-mkconfig -o /mnt/boot/grub/grub.cfg
sudo grub-install --boot-directory=/mnt/boot /dev/mmcblk0 --force
Now it is time to leave the ubuntu environment and reboot.
SeaBios
- Can be reached via CTRL + L on Boot
- You may get an error saying “graphics initialization failed”; apparently this is a bug that can be fixed by typing “help” and pressing enter twice.
Troubleshooting
You’ve done something wrong and now Chrome OS doesn’t work, or you’re being dropped into a GRUB> prompt.
Chrome OS Recovery
If you are getting an error that “Chrome OS is missing or damaged” when trying to boot it, then you need to use Chrome OS Recovery. This will reset your Chromebook to its original out-of-box state (wiping your data), which also makes it useful as a way to go back to single-boot Chrome OS.
Linux install failed
Does your Chrome OS still boot? If so, just wipe your KERN-C and ROOT-C partitions with mkfs.ext4 and try again, assuming that your partitions are the correct size; if all goes well this should preserve your Chrome OS installation.
Linux boot fails
If you’re getting a black screen after pressing Ctrl+L, getting stuck at “Booting from hard disk”, or a GRUB> prompt, it’s likely that the GRUB fix described above didn’t work. Double check to make sure you installed the boot loader to the correct partition, as well as did grub-install to the right place. Even if you have installed your Linux correctly, it can sometimes break after booting from a Live CD, or updating the Linux kernel.
Just run the GRUB install step again and this should take care of the issue.
Chrome OS Security
Remember that ChromeOS now has Developer Mode enabled! Access a terminal and use sudo chromeos-setdevpasswd to set a password for chronos !
Final Result
- Boot Pixelbook
- Press CTRL + D or wait 30 seconds -> Boots Chrome OS
- Press CTRL + L -> Opens SeaBios, which boots Linux
Linux Setup
Ensure that the correct mount options in /etc/fstab for /boot as well as / are set!
chrx uses ext4 defaults,discard,relatime 1 1
ChromeOS uses ext4 rw,seclabel,nodev,noatime,commit=600
I decided to give both /boot and / the following options: noatime,commit=600
Meaning that after copying data in the terminal via mv, cp, rsync, etc. I explictily call sync in order to be 100% sure to not lose data.
Linux Specific Fixes
- Fix Suspend & More: https://wiki.archlinux.org/title/Chrome_OS_devices#Introduction
- Suspend via Script on specific USB Port: https://itectec.com/ubuntu/ubuntu-how-to-use-a-key-press-to-wake-a-suspended-laptop-when-using-a-kvm-switch/
- GitHub > FascinatingCaptain > CBFixesAndTweaks
- Add your user to the sudoers group: login as root, then
usermod -aG sudo <username>
Keyboard Backlight
# Create LEDS group
sudo groupadd leds
# Add user
sudo usermod -aG leds <username>
# Add Rules
sudo nano /lib/udev/rules.d/99-pixelbook.rules
# Content:
# Allow members of the "leds" group to write to all leds.
# This lets non-root users change the keyboard backlight
# brightness

SUBSYSTEM=="leds", ACTION=="add", RUN+="/bin/chgrp -R leds /sys%p", RUN+="/bin/chmod -R g=u /sys%p"
SUBSYSTEM=="leds", ACTION=="change", ENV{TRIGGER}!="none", RUN+="/bin/chgrp -R leds /sys%p", RUN+="/bin/chmod -R g=u /sys%p"

# Use:
echo 100 > /sys/class/leds/chromeos\:\:kbd_backlight/brightness
echo 0 > /sys/class/leds/chromeos\:\:kbd_backlight/brightness
Linux Software
- sudo apt update
- sudo apt install ssh rsync vim
- sudo dpkg-reconfigure tzdata
- sudo apt install xbindkeys xdotool xbacklight xvkbd
Install Chrome
wget https://dl.google.com/linux/direct/google-chrome-stable_current_amd64.deb
sudo apt install ./google-chrome-stable_current_amd64.deb
google-chrome
Windows
- Reddit > Chrultrabook > Getting Started
- Reddit > Pixelbook > Windows Firmware Status Tracker
- mrchromebox.tech > fwscript
Yes, this OS exists too and is - alledgedly - relatively well supported on the Pixelbook The WiFi Drivers can be found here Windows® 10 WiFi package drivers 22.70.0 for the AX210/AX200/9000/8000 series Intel® Wireless Adapters.
- Install WiFi drivers, then everything else should be automatically installed when running Windows Update.
- TapToClick Utility fixes missing tap-to-click functionality in the Pixelbook’s touchpad driver [KBL audio drivers] (https://mrchromebox.tech/files/windrv/kbl_cros_drivers_1.0.exe)
- Run the driver installer, then go into Device Manager and point any unknown devices to the driver installation folder to search. At the end, you’ll have a handful of unknown devices without drivers still.
The main problem is that it is only possible after removing the Firmware Write Protect and installing a UEFI Firmware.
Change GBB Options to prevent accidental Developer Mode Deactivation
This step requires a short disabling of the Firmware write protection, changing GBB Flags, then re-enabling the write protection.
For the Pixelbook this can only be done by physically opening the device and using a special debugging cable!
- ArchLinux Wiki > Chrome OS Devices > Boot to SeaBios by Default
- Enter a superuser shell by booting in developer mode,
CTRL + D, accessing VT2 and logging in as chronos - Disable Firmware write protection via
flashrom --wp-disable - Check that write protection is disabled
flashrom --wp-status - Run set_gbb_flags.sh with no parameters
/usr/share/vboot/bin/set_gbb_flags.shThis will list all of the available flags. The ones of interest to us are:
GBB_FLAG_DEV_SCREEN_SHORT_DELAY 0x00000001
GBB_FLAG_FORCE_DEV_SWITCH_ON 0x00000008
GBB_FLAG_FORCE_DEV_BOOT_LEGACY 0x00000080
GBB_FLAG_DEFAULT_DEV_BOOT_LEGACY 0x00000400
- So, to set SeaBIOS as default, with a 1s timeout, prevent accidentally exiting Developer Mode via spacebar, and ensure Legacy Boot Mode remains enabled in the event of battery drain/disconnect, we set the flags as such:
/usr/share/vboot/bin/set_gbb_flags.sh 0x489 - Enable back the software write protection
flashrom --wp-enable